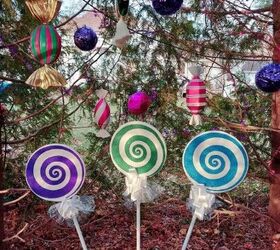
Have you ever thought about how to sprinkle a little sweetness into your outdoor space? As someone who loves both gardening and crafts, I’ve found that adding DIY outdoor candy decorations can truly transform any garden or patio into a whimsical wonderland. Not only do these decorations brighten up your space, but they also bring a smile to the faces of everyone who visits. In this article, I’ll share my personal experiences, tips, and creative ideas that will help you embark on your own candy decoration journey.
Why Choose DIY Outdoor Candy Decorations?
There’s something magical about candy-themed decorations. They evoke childhood memories and can create a joyful atmosphere. Here are some reasons why DIY outdoor candy decorations might be the right choice for you:
- Personal Touch: Handmade decorations reflect your unique style and creativity.
- Affordable: Creating your own decorations can save you money compared to buying pre-made items.
- Fun Activity: DIY projects are enjoyable and can be a great way to spend time with family or friends.
- Customizable: You can tailor your decorations to fit any occasion, from birthdays to seasonal events.
Essential Materials for Your Candy Creations
Before diving into projects, it’s crucial to gather the right materials. Here’s a list to help you get started:
Basic Supplies
- Crafting glue (water-resistant for outdoor use)
- Colorful paints and markers
- Scissors
- Clear sealant spray
- Wooden dowels or skewers
- Plastic containers or jars
Candy Supplies
- Fake candy (polymer clay, felt, or foam)
- Real candy for displays (consider weather conditions)
- Wrapping materials (cellophane, tulle)
Top DIY Outdoor Candy Decoration Ideas
Now that we’ve gathered our materials, let’s explore some exciting DIY projects!

1. Lollipop Garden Stakes
Brighten up your flower beds or garden with colorful lollipop stakes! Here’s how to create them:
Materials Needed
- Wooden dowels
- Colorful foam sheets or painted cardboard
- Crafting glue
- Clear sealant
Instructions
- Cut out circles or shapes from the foam sheets.
- Glue these shapes onto the tops of the wooden dowels.
- Seal with clear spray to protect them from weather.
- Stick them into your garden or flower pots to create a candy land effect!

2. Candy Jar Centerpieces
Your outdoor dining area will look vibrant with candy jar centerpieces. Here’s a simple way to make them:
Materials Needed
- Clear glass jars
- Fake candies (or real, for occasional use)
- Decorative ribbons
- LED fairy lights (optional)

Instructions
- Fill the jars with fake candies or wrapped real candies.
- Wrap ribbons around the necks of the jars for added flair.
- For a magical effect, place LED fairy lights inside the jars.
3. Candy Wreaths
A candy wreath is not just for Christmas! You can create cheerful wreaths for any season.

Materials Needed
- Wire wreath frame
- Fake candies
- Floral wire or glue
- Embellishments (flowers, ribbons)
Instructions
- Attach fake candies to the wire frame using floral wire or glue.
- Add embellishments like flowers or ribbons for extra charm.
- Hang your wreath on your front door or garden gate!

Comparing Fake vs. Real Candy for Outdoor Decorations
| Criteria | Fake Candy | Real Candy |
|---|---|---|
| Durability | High – withstands weather | Low – can melt or spoil |
| Cost | Generally low for bulk purchases | Varies, can add up quickly |
| Visual Appeal | Always colorful and vibrant | Realistic but can degrade over time |
| Maintenance | Low – no upkeep needed | High – needs replacement frequently |
Pros and Cons of DIY Outdoor Candy Decorations

Pros
- Allows for personal creativity.
- Can be made from inexpensive materials.
- Provides a fun activity for families.
- Versatile for various themes and occasions.
Cons
- Time-consuming depending on the project.
- Weather conditions can limit options.
- Requires some crafting skill and patience.

Maintenance Tips for Your Candy Decorations
Once your stunning candy decorations are set up, it’s important to maintain them. Here are some tips:
- Check for wear and tear regularly, especially after bad weather.
- Store decorations indoors during off-seasons to prolong their life.
- Clean surfaces with a damp cloth to prevent dust build-up.
FAQs About DIY Outdoor Candy Decorations
What types of candy should I use for outdoor decorations?
Fake candies made from materials like polymer clay or foam are ideal for outdoor decorations due to their durability. However, if you prefer real candy, consider using wrapped candy that can withstand light rain and won’t melt easily.
How can I protect my decorations from weather conditions?
Using clear sealant spray on your decorations can help protect them from moisture and UV rays. Additionally, consider moving delicate decorations indoors during severe weather.
Can I involve children in making these decorations?
Absolutely! Many of these DIY projects are suitable for children, especially the simpler tasks like painting or arranging fake candies. Just ensure that adult supervision is provided for crafting tools.
Are there any specific themes I can use with candy decorations?
Yes! Candy decorations can fit various themes, from a sweet garden party to a whimsical fairy tale setting. You might also consider seasonal themes, like Halloween or Valentine’s Day.
How long do DIY candy decorations typically last?
The lifespan of your decorations will depend on the materials used. Fake candy decorations can last for several years if properly maintained, while real candy may only last until it’s consumed or becomes unusable due to weather.
Conclusion
DIY outdoor candy decorations can add a delightful and personal touch to your garden or patio. With some creativity, basic supplies, and a sprinkle of fun, you can create an enchanting outdoor space that everyone will love. So gather your materials, unleash your creativity, and let your candy-themed decorations bring sweetness to your outdoor areas!