Polish egg decorating, or Pisanki, is an age-old tradition that transforms simple eggs into exquisite works of art. The practice has roots that date back to ancient Slavic customs and is particularly vibrant during the Easter season. In this comprehensive guide, we will explore the fascinating history, techniques, and materials involved in creating stunning Pisanki eggs. Whether you’re a novice or an experienced decorator, you’ll find inspiration and helpful tips to dive into this beautiful craft.
What Are Pisanki Eggs?
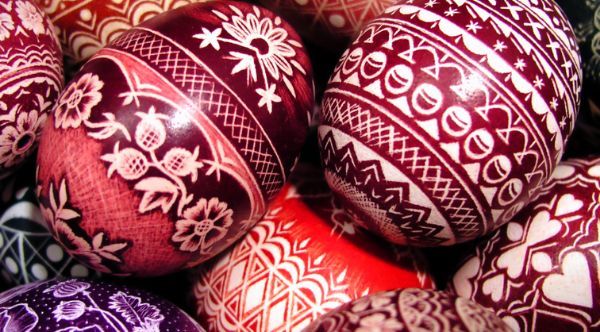
Pisanki refers to the decorated eggs, typically made for Easter in Poland. The name comes from the Polish word pisać, which means “to write,” highlighting the technique of drawing designs on the eggs. These intricate creations have various meanings, often symbolizing renewal and the arrival of spring.
History of Polish Egg Decorating
The tradition of decorating eggs in Poland can be traced back over a thousand years, with influences from various cultures. Initially, these eggs were painted in simple colors. However, as time progressed, the art evolved, incorporating intricate patterns and symbolic meanings. Each region of Poland developed its unique styles and motifs, making Pisanki a vibrant part of Polish heritage.
Traditional Techniques
Polish egg decorating employs several techniques, each yielding distinctive results. Here are a few of the most popular methods:
- Kraszanki: Eggs dyed in a single color, often bright shades, using natural dyes.
- Kleksy: A technique that involves using a wax resist to create patterns, then dyeing the eggs.
- Drukowane: Printed patterns that are applied to the eggs.
Materials Needed for Polish Egg Decorating
Embarking on your egg decorating journey requires a few essential materials. Here’s a checklist to help you gather everything you need:
| Material | Purpose |
|---|---|
| Raw eggs | Base for decoration |
| Wax (beeswax) | Resist for dyeing |
| Dyes (natural or synthetic) | To color the eggs |
| Stylus or kistka | For applying wax |
| Sponge | To apply dye |
| Vinegar | To help set dye colors |
| Gloves | To protect your hands |
Choosing the Right Eggs
When selecting eggs for decorating, you can either use raw eggs or blown-out eggs (empty shells). Blown-out eggs are often preferred for their longevity. Here are some pros and cons:
Pros and Cons of Raw vs. Blown-Out Eggs
| Type | Pros | Cons |
|---|---|---|
| Raw Eggs | Authentic texture, easier to dye | More fragile, won’t last long |
| Blown-Out Eggs | Durable, suitable for long-term display | Requires more preparation, harder to dye |
Step-by-Step Guide to Decorating Pisanki Eggs
Preparation
Once you’ve gathered your materials, it’s time to prepare your workspace. Here’s how:
- Cover your workspace with newspapers to avoid dye stains.
- Set up your dyes according to the instructions on the packaging, adding vinegar as needed.
- Prepare the eggs by either emptying them or using raw ones.

Applying Wax Designs
Using your kistka, apply melted beeswax to create your designs:
- Dip your kistka into the melted wax.
- Carefully draw your design on the egg’s surface.
- Allow the wax to harden before proceeding to dye.
Dyeing Your Eggs
Now it’s time to bring your Pisanki to life with color:
- Submerge the egg in the dye for the recommended time.
- Remove the egg and rinse it gently with cold water.
- Allow the egg to dry completely.
Final Touches
Once the dye has dried, it’s time to remove the wax and admire your creation:
- Use a candle to melt and wipe away the wax.
- Polish the egg gently with a soft cloth to enhance the shine.
Creative Ideas for Pisanki Designs
Stuck on ideas? Here are some creative themes you can consider for your Pisanki:
- Floral patterns: Use flowers native to Poland for inspiration.
- Geometric shapes: Play with lines and shapes for a modern twist.
- Traditional motifs: Investigate regional designs unique to various Polish cultures.
- Personal messages: Incorporate well wishes or inspirational quotes.
Common Mistakes to Avoid
As someone who has donned the role of a novice egg decorator, I can vouch that mistakes are part of the learning process! Here’s a quick list of common pitfalls to avoid:
- Skipping the wax application: This is crucial for retaining colors.
- Using too hot dye: This can cause the egg to crack.
- Not allowing the wax to cool: This can result in smudged designs.
Frequently Asked Questions
What types of eggs can be used for Pisanki decorating?
You can use both raw and blown-out eggs. Blown-out eggs are preferred for their durability.
Can I use food coloring for dyeing eggs?
Yes, food coloring can be used to create bright colors, but be sure to follow the proper dyeing procedures.

How long do decorated eggs last?
Blown-out eggs can last for many years if stored properly, while raw eggs will only last a few days unless refrigerated.
Is there an age limit for egg decorating?
No, this craft can be enjoyed by people of all ages! However, children should be supervised, especially when working with hot wax.
Can I use natural dyes instead of synthetic ones?
Absolutely! Natural dyes can be made from various plants, fruits, and spices, and they often yield beautiful, earthy tones.
Conclusion
Polish egg decorating is not just an artistic endeavor but a heartfelt tradition that brings families together during Easter. Through this guide, I hope you feel inspired to explore the creative world of Pisanki. So gather your materials, embrace your artistic side, and bring a piece of Polish culture into your home!