Spring is not just a season; it’s a celebration of colors, flavors, and of course, the beloved carrot! What better way to herald the arrival of spring than with delightful chocolate carrot decorations? As a passionate baker and chocolatier, I’ve found that these whimsical treats can elevate your desserts to a whole new level. In this comprehensive guide, I will share my personal experiences, practical tips, and creative ideas to help you master the art of chocolate carrot decorations.
What Are Chocolate Carrot Decorations?
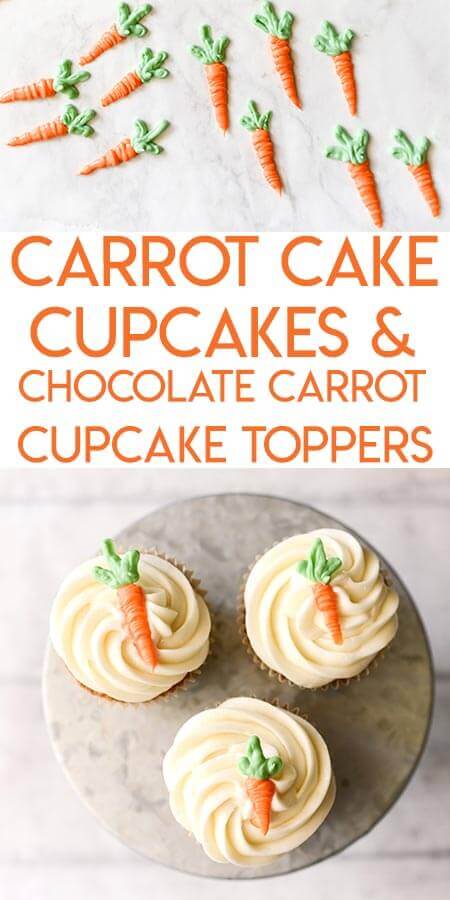
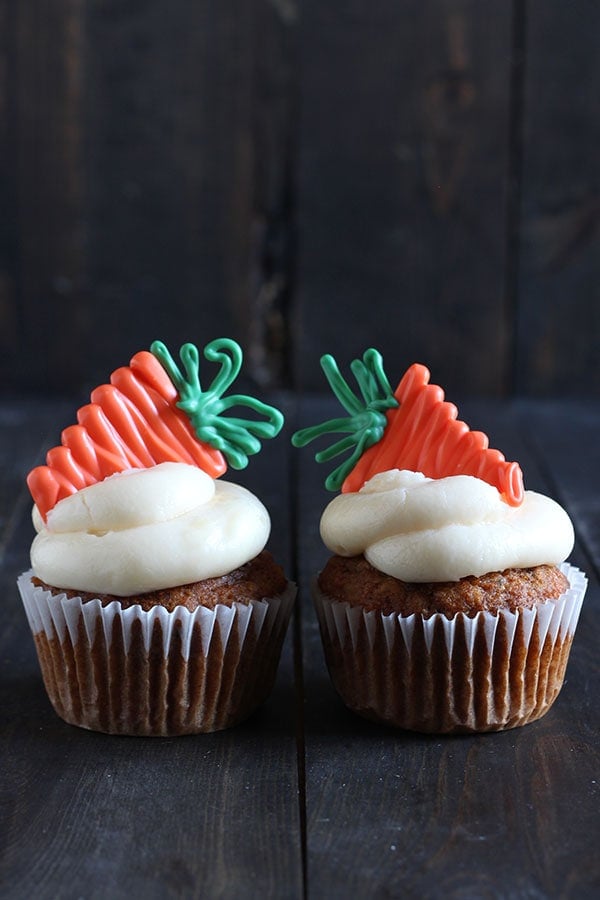
Chocolate carrot decorations are intricately designed chocolate pieces shaped like carrots, often used to garnish cakes, cupcakes, or other desserts. They are typically crafted using colored chocolate or candy melts, molded into carrot shapes, and can be accompanied by various edible decorations like green icing or sprinkles.
The Appeal of Chocolate Carrot Decorations
Why choose chocolate carrot decorations? For me, it’s all about charm and flavor. They add a playful touch to desserts, are visually stunning, and they offer a delightful taste contrast with the sweet and creamy chocolate against the backdrop of fresh carrot-flavored treats.
Springtime Themes
Carrots symbolize the arrival of spring, making them perfect for Easter-themed desserts, birthday parties, or any spring-time event. Incorporating chocolate carrot decorations into your baking is an excellent way to elevate your presentation and impress your guests.
Versatility
Chocolate carrot decorations are incredibly versatile. Whether you’re decorating a simple cupcake or a grand layered cake, these delightful treats can suit any baked good and/or occasion.
How to Make Chocolate Carrot Decorations
Ready to get started? Here’s a step-by-step guide to creating your own chocolate carrot decorations.
Ingredients Needed
- Colored candy melts (orange, green)
- Silicone carrot molds
- Piping bags
- Edible glitter (optional)
- Knife and cutting board
- Wax paper
Step-by-Step Instructions
- Melt the Chocolate: In two separate bowls, melt the orange and green candy melts according to package instructions. Use the microwave or a double boiler for the best results.
- Prepare the Molds: Lightly grease the silicone carrot molds with cooking spray to facilitate easy removal.
- Pour the Chocolate: Fill each carrot mold with melted orange candy melt. Gently tap the mold on the counter to remove any air bubbles.
- Add Green Tops: After letting the orange melt set a bit (but not completely), use a piping bag to add the melted green candy melts on top to create the carrot tops.
- Chill: Place the molds in the refrigerator for 15-20 minutes until the chocolate is hard.
- Remove from Molds: Once set, gently remove the chocolate carrots from the molds and place them on wax paper.
- Decorate: Optionally, sprinkle edible glitter for that extra sparkle!

Creative Ideas for Using Chocolate Carrot Decorations
Now that you’ve mastered the basics, let’s explore how to use these delightful decorations in your baking.
As Cupcake Toppers
One of the easiest ways to showcase your chocolate carrots is by placing them on top of cupcakes. Pair them with carrot cake-flavored cupcakes topped with cream cheese frosting for a delightful combination.

On Layered Cakes
Enhance the visual appeal of a layered cake by arranging chocolate carrot decorations around the top or sides. It creates a whimsical forest effect that’s sure to turn heads!
In Cookies and Bars
Use chocolate carrot decorations to embellish cookies or bars. These can be made with carrot cake or any vanilla-flavored treat, giving it that spring vibe.

As Party Favors
Wrap chocolate carrot decorations in cellophane bags with a cute tag for an adorable party favor. It’s a sweet and unique way to say thank you to your guests!
Pros and Cons of Chocolate Carrot Decorations
| Pros | Cons |
|---|---|
| Visually appealing and fun | May require some practice to master |
| Versatile for various occasions | Can be time-consuming to make |
| Delicious chocolate flavor | Requires special molds and tools |

Tips for Perfect Chocolate Carrot Decorations
Here are some of my top tips for achieving the best chocolate carrot decorations:
Use High-Quality Chocolate
Always opt for high-quality candy melts or chocolate for the best taste and appearance. They melt better and provide a smoother finish.
Experiment with Flavors
Why stop at chocolate? Try infusing some carrot cake flavoring into your chocolate for a delightful surprise!

Practice Patience
Your first batch may not be perfect, and that’s okay! Practice makes perfect, and you’ll improve with each attempt.
FAQs About Chocolate Carrot Decorations

Can I make chocolate carrot decorations without molds?
Yes! You can pipe the melted chocolate into carrot shapes on wax paper and allow them to set. This method is a bit more difficult, but it’s a great option if you don’t have molds.
How long do chocolate carrot decorations last?
Properly stored in an airtight container, chocolate carrot decorations can last for up to two weeks. Just be sure to keep them in a cool, dry place.
Can I color white chocolate to make carrot decorations?
Absolutely! You can use food coloring to tint white chocolate orange or green. Ensure you use oil-based food coloring, as water-based coloring can cause the chocolate to seize.
What other decorations can I make with this technique?
The techniques used for chocolate carrots can be applied to create various other shapes like bunnies, eggs, and flowers—perfect for a spring-themed dessert table!
Conclusion
Chocolate carrot decorations are not just a fun and delightful addition to your baked goods—they also embody the spirit of spring. With a little creativity and practice, you can create stunning edible art that will impress your friends and family. So grab your molds and get ready to bring a touch of sweetness to your next dessert creation!
Thank you for reading my comprehensive guide. I hope you feel inspired to create your own chocolate carrot decorations and share your unique creations with the world!