Introduction to Cranial Helmets and Their Purpose
Cranial helmets are often recommended for infants with positional plagiocephaly, also known as flat head syndrome. While the primary objective of these helmets is to reshape the skull gently, many parents today are finding ways to decorate these helmets, making them not only functional but also fun and personalized.
In this article, I will share my personal experiences and insights into cranial helmet decoration, along with tips, ideas, and important considerations to create a design that reflects your child’s personality.
The Importance of Helmet Decoration
Decorating cranial helmets serves multiple purposes:
- Personalization: Helps your child stand out and express individuality.
- Emotional Comfort: A unique design can make the helmet feel less clinical and more like an accessory.
- Positive Attention: A decorated helmet can turn heads and invite conversations, which can be helpful in social settings.
Popular Decoration Ideas for Cranial Helmets
There are countless ways to decorate a cranial helmet! Here are some popular ideas that I’ve seen and even tried myself:
1. Stickers and Decals
Using stickers is perhaps the simplest way to add flair to a helmet. Choose vinyl stickers that are durable and waterproof. Make sure they are non-toxic and safe for your child.
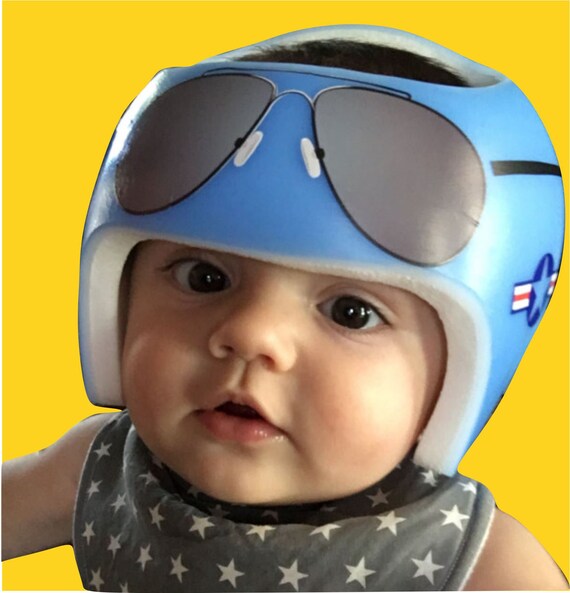
2. Custom Paint Jobs
If you’re feeling artistic, using non-toxic paint to create a custom design can be a rewarding experience. Just ensure it’s breathable and safe for the helmet material.
3. Fabric Covers
Another great option is to use fabric covers. These can be custom-made to fit over the helmet and can be removed and washed easily. This is a fantastic way to change designs regularly!
Materials Needed for Helmet Decoration
Before you dive into decorating, gather the materials you’ll need:
- Vinyl stickers
- Non-toxic paints
- Fabric for covers
- Adhesive spray (for fabric covers)
- Brushes and sponge applicators
- Clear sealant spray (for painted designs)
Step-by-Step Guide to Decorating a Cranial Helmet
Step 1: Clean the Helmet
Ensure that the helmet is clean and dry before starting your decoration. Use gentle soap and water, and let it air dry completely.
Step 2: Plan Your Design
Sketch out your ideas on paper. This will give you a better sense of what you want the final product to look like.
Step 3: Apply Stickers or Paint
If using stickers, position them carefully before pressing down. For painting, start with a base coat and allow it to dry before adding details.

Step 4: Add a Sealant
Once your design is complete, apply a clear sealant spray. This step is crucial to protect your artwork and ensure durability.
Step 5: Present to Your Child
Once dry, present the helmet to your child! Their excitement as they see their personalized helmet can be incredibly rewarding.

Pros and Cons of Decorating Cranial Helmets
| Pros | Cons |
|---|---|
| Enhances personal expression | Extra time and effort required |
| Increases comfort through familiarization | Potential for stickers/paint to peel |
| Encourages social interaction | Need for regular maintenance |
Tips for Long-Lasting Helmet Decorations
To ensure your helmet decorations last throughout your child’s treatment, here are some additional tips:
- Choose high-quality materials that are durable and washable.
- Avoid heavy embellishments that might weigh down the helmet.
- Regularly check the helmet for signs of peeling or wear and repair as needed.

Personal Stories: Decorating My Child’s Helmet
When my son was prescribed a cranial helmet, the initial thought of its plain appearance made me nervous. I wanted him to feel special and confident. So, I decided to decorate it.
We started with colorful stickers featuring his favorite characters. The transformation was incredible! Not only did he seem to enjoy wearing it more, but friends and family also complimented his unique look. It became a talking point, making this challenging journey a little lighter.
Frequently Asked Questions
1. Is it safe to decorate a cranial helmet?
Yes, as long as you use non-toxic materials and ensure they don’t interfere with the helmet’s function.

2. How often should I change my child’s helmet decoration?
You can change it as often as you like! Regular changes can keep it fun and exciting for your child.
3. Can I use any type of paint on the helmet?
No, always choose non-toxic, breathable paints that are safe for children.

4. Will decorations affect the helmet’s fit?
Properly applied decorations should not alter the fit. However, monitor the helmet regularly to ensure it still fits comfortably.