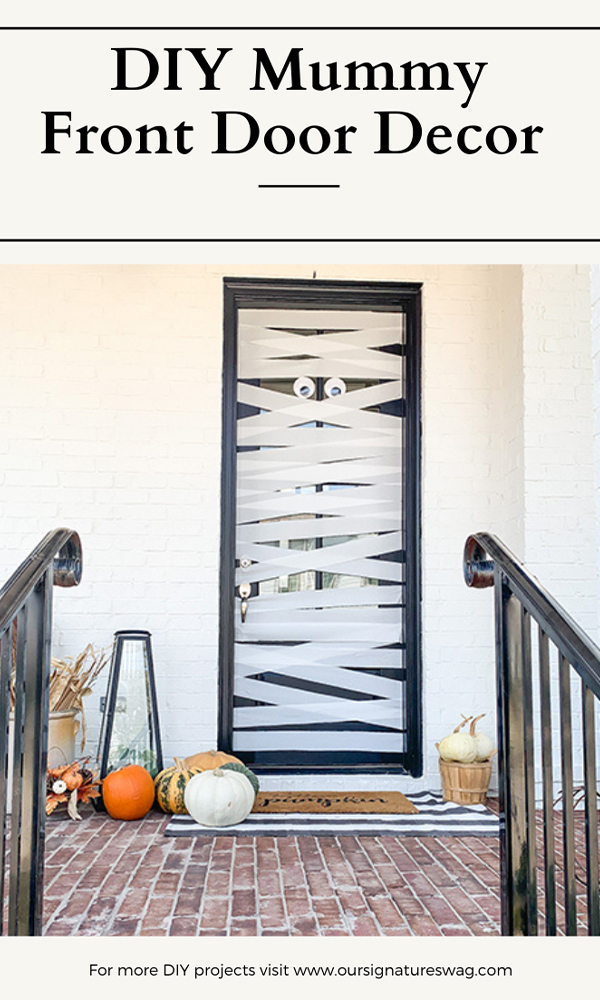
Halloween is just around the corner, and it’s time to transform your home into a spooky haven! One of the most eye-catching and fun decorations is the mummy door. In this article, I will share not only practical tips for creating your own mummy door but also delightful stories from my personal Halloween adventures. Let’s dive into the world of mummy door decoration!
Introduction to Mummy Door Decorations
When it comes to Halloween, I have always been captivated by the thrill of decorating. The eerie atmosphere, the spooky sounds, and the excitement of inviting trick-or-treaters into your home is simply irreplaceable. My passion for Halloween crafts has led me to explore various decoration styles, and none has been quite as rewarding as the mummy door decoration.
Why Choose Mummy Door Decorations?
Mummy door decorations are not only fun to make but also incredibly versatile. Here are some compelling reasons to consider them for your Halloween decor:
- Family-Friendly: These decorations are suitable for all ages and can be a fun project to do with children.
- Customizable: You can tailor the look to match your personal style or the vibe of your neighborhood.
- Budget-Friendly: Most materials needed are inexpensive, making it accessible for everyone.
- Visually Striking: Mummy doors create an immediate impact and set a spooky tone for Halloween.
Getting Started with Mummy Door Decorations
Materials Needed
Before we dive into the decoration process, let’s gather the essential materials:
| Material | Purpose |
|---|---|
| White Tulle or Cheesecloth | To wrap the door and create the mummy effect. |
| Googly Eyes | To give your mummy a fun and spooky look. |
| Adhesive (Glue or Tape) | To secure the tulle or cheesecloth to the door. |
| Scissors | For cutting the tulle to the desired length. |
| Optional Decor (Spider, Cobwebs) | Add additional spooky elements to enhance the mummy theme. |
Creating Your Mummy Door: Step-by-Step Guide
Now that we have our materials ready, let’s start crafting!
Step 1: Prepare the Door Surface
Ensure your door is clean and dry. This will help the adhesive stick better.
Step 2: Cut the Tulle
Cut your tulle or cheesecloth into strips. The length of each strip can be about 3-4 feet, depending on how tall your door is.

Step 3: Wrap the Door
Starting at the top, begin wrapping the strips of tulle around the door. Overlap them as you go down to create a layered look.
Step 4: Secure the Ends
Use glue or tape to secure the ends of the tulle to the door. Make sure it’s secure enough to withstand any wind or moisture.

Step 5: Attach Googly Eyes
Now it’s time for the fun part! Stick the googly eyes at various heights and positions to give your mummy personality.
Step 6: Optional Enhancements
Feel free to add spooky extras like spiders, cobwebs, or even a “Beware of Mummy” sign for added effect!

Pros and Cons of Mummy Door Decorations
Pros
- Easy to create, even for beginners.
- Engaging family activity that fosters creativity.
- Cost-effective using common household materials.
- Great way to enhance your home’s curb appeal during Halloween.
Cons
- May require redoing if damaged by weather.
- Not a permanent decoration; must be set up annually.
- Can become repetitive if not altered each year.

Unique Mummy Door Decoration Ideas
Looking to elevate your mummy door into something extraordinary? Here are some unique ideas I’ve tried and loved:
Mummy with a Twist
Instead of a traditional white mummy, use colored tulle or fabric. A pink or purple mummy can be fun for a kid-friendly look!

Interactive Mummy Door
Add a doorbell that plays spooky sounds or music when pressed. It’s a great way to engage the trick-or-treaters.
Glow-in-the-Dark Mummy
Incorporate glow-in-the-dark paint on the eyes to make your mummy eerie at night!

Personal Experience: My First Mummy Door
Reflecting on my first attempt at mummy door decoration brings a smile to my face. I remember gathering supplies with my children and how excited they were to help! We set up in the late afternoon, and as the sun began to set, the door transformed into a spooky sight. On Halloween night, the joy on the trick-or-treaters’ faces was priceless. It made all the effort worth it!
Maintaining Your Mummy Door Decoration
To ensure your mummy door lasts throughout the Halloween season, here are some maintenance tips:
- Check for loose tulle or fabric every few days and re-secure as necessary.
- Keep an eye on the weather; if rain is expected, consider bringing decorations inside temporarily.
- If you notice fading or wear and tear, consider an annual refresh or upgrade to new materials.

Frequently Asked Questions About Mummy Door Decorations
What materials can I use for a mummy door decoration?
You can use white tulle, cheesecloth, or even old bed sheets to create the mummy effect.
How do I make my mummy door more creative?
Incorporate personal touches like funny signs, colored fabrics, or glow-in-the-dark elements for a unique look!
Can I use mummy decorations inside my home?
Absolutely! Mummy decorations can also work as spooky decor for your interior, not just the front door.
What age group is this decoration suitable for?
Mummy door decorations are perfect for all ages, making them a great family activity.