Cake decorating has reached new heights of creativity, and what better way to elevate your cake game than by adding everyone’s favorite chocolate bar – Kit Kat! As a passionate baker, I’m excited to share my journey into the world of Kit Kat decorated cakes, complete with tips, tricks, and personal stories to inspire your baking adventure.
What is a Kit Kat Decorated Cake?
A Kit Kat decorated cake is essentially any cake that incorporates Kit Kat bars as a decoration. This can range from a simple layer cake with Kit Kats around the edges to elaborate creations with multiple layers and fillings. The beauty of a Kit Kat cake lies not only in its taste but also in its visual appeal, making it a popular choice for birthdays, celebrations, and special occasions.
Why Choose Kit Kat for Cake Decorating?
Choosing Kit Kat for your cake decorating needs comes with a myriad of benefits:
- Flavor Variety: Kit Kats come in different flavors, including milk chocolate, dark chocolate, and seasonal editions like matcha or strawberry.
- Texture: The crispy wafers combined with smooth chocolate create a delightful texture that enhances any cake.
- Visual Appeal: Their distinct shape and bright colors make for eye-catching decorations.
- Ease of Use: Kit Kats are easy to work with, making them perfect for both novice and experienced bakers.
Gathering Your Ingredients and Tools
Before diving into the decorating process, let’s gather everything you’ll need to create a stunning Kit Kat cake.
Essential Ingredients
- For the Cake:
- 2 cups all-purpose flour
- 1 ½ cups sugar
- ½ cup unsweetened cocoa powder
- 1 cup unsalted butter
- 4 large eggs
- 1 cup milk
- 2 tsp baking powder
- 1 tsp vanilla extract
- For the Frosting:
- 1 cup unsalted butter, softened
- 4 cups powdered sugar
- ½ cup cocoa powder
- ½ cup milk
- 1 tsp vanilla extract
- For Decoration:
- 1 pack of regular Kit Kat bars
- Optional: Additional candies, edible glitter, or fresh fruits

Essential Tools
- Mixing bowls
- Whisk
- Spatula
- 9-inch round cake pans
- Offset spatula for frosting
- Cake boards
- Sharp knife
Step-by-Step Guide to Making a Kit Kat Decorated Cake
Now, let’s get into the exciting part: building and decorating the cake!

Step 1: Bake the Cake
- Preheat your oven to 350°F (175°C).
- Grease and flour your cake pans.
- In a large mixing bowl, cream the butter and sugar until light and fluffy.
- Add the eggs one at a time, mixing well after each addition.
- In another bowl, sift together the flour, cocoa powder, and baking powder.
- Gradually add the dry ingredients to the wet mixture, alternating with milk and vanilla extract. Mix until just combined.
- Divide the batter evenly between the prepared pans and bake for 30-35 minutes or until a toothpick inserted into the center comes out clean.
- Let the cakes cool in the pans for 10 minutes before transferring to a wire rack to cool completely.
Step 2: Prepare the Frosting
While the cakes cool, you can prepare your frosting:
- In a mixing bowl, beat the softened butter until creamy.
- Gradually add powdered sugar and cocoa powder, mixing well.
- Add milk and vanilla extract, beating until the frosting is smooth and spreadable.

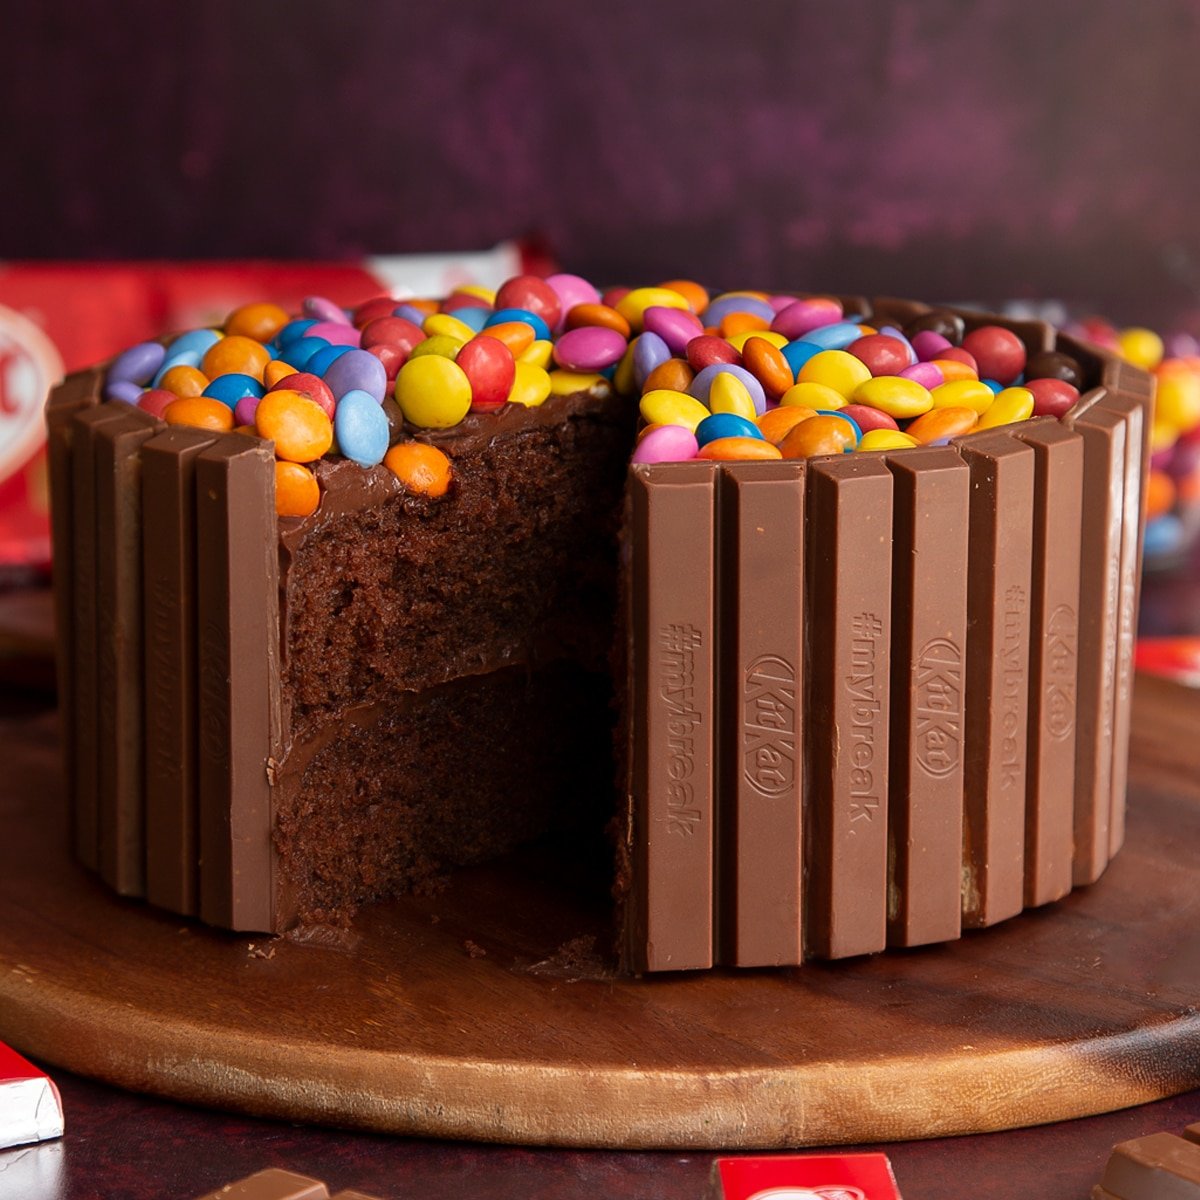
Step 3: Assemble the Cake
Once the cakes are completely cooled, it’s time to assemble them:
- Place one layer of cake on a cake board or serving plate.
- Spread an even layer of frosting on top of the first cake layer.
- Place the second layer on top and apply a thin coat of frosting around the sides and top of the cake (this is called a crumb coat).
- Chill the cake in the refrigerator for about 30 minutes to set the crumb coat.
- After chilling, apply a thicker layer of frosting to the entire cake.
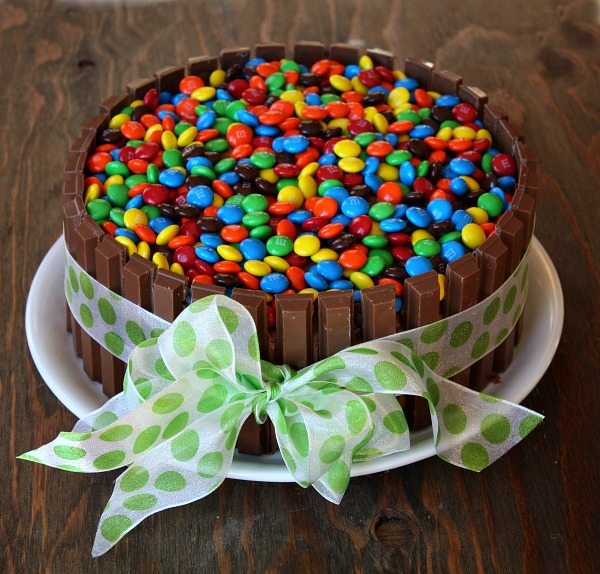
Step 4: Decorate with Kit Kat Bars
Now comes the fun part! Here’s how to beautifully decorate your cake with Kit Kat bars:
- Stand the Kit Kat bars vertically along the sides of the cake, pressing them gently into the frosting to secure.
- For added flair, you can tie a ribbon around the cake to hold the Kit Kats in place.
- Top your cake with more Kit Kats or additional decorations like candies or fruits.
Tips for Perfecting Your Kit Kat Cake
Based on my experiences, here are some tips to ensure your Kit Kat decorated cake stands out:
- Use Fresh Ingredients: Always opt for fresh ingredients to guarantee the best flavor.
- Chill Your Frosting: If your frosting becomes too soft, chilling it can help you achieve a better consistency for decorating.
- Experiment with Flavors: Don’t hesitate to try different cake flavors or fillings like strawberry or vanilla to complement the chocolate taste of Kit Kats.
- Stay Creative: Use other candies or fruits to enhance the visual appeal and flavor of your cake. Consider adding berries, chocolate drizzle, or even sprinkles!
Pros and Cons of Kit Kat Decorated Cakes
| Pros | Cons |
|---|---|
| Visually stunning and appealing | Can be heavy due to extra chocolate |
| Easy to make and assemble | Requires refrigeration if not consumed quickly |
| Customizable with various flavors | Some may find it too sweet |
Variations of Kit Kat Cakes
Once you become comfortable with the basic Kit Kat cake, consider trying these variations:
1. Kit Kat Cheesecake
Swap out the traditional cake for a no-bake cheesecake filled with crushed Kit Kats and topped with chocolate ganache.

2. Kit Kat Cupcakes
Transform your cake into cupcakes, topping each with a piece of Kit Kat and frosting for individual servings.
3. Kit Kat Layer Cake
Create a multi-layered cake with various fillings, frosting it generously and placing Kit Kats between the layers.
Frequently Asked Questions (FAQs)
What are some alternatives to Kit Kat bars for cake decorating?
While Kit Kats are a favorite, you can use other candies like Twix, Snickers, or even chocolate-covered pretzels for a unique twist!
Can I make a Kit Kat cake ahead of time?
Yes! You can bake the cake a day in advance and frost it right before you plan to serve it. Just keep it refrigerated to maintain freshness.
How do I store a Kit Kat decorated cake?
Store your cake in an airtight container in the refrigerator for up to 3 days. Allow it to come to room temperature before serving for the best taste.
Can I use gluten-free ingredients for a Kit Kat cake?
Absolutely! Substitute all-purpose flour with a gluten-free blend, and ensure your Kit Kats are gluten-free as well.
Conclusion
Creating a Kit Kat decorated cake is not only a delightful culinary experience but also a wonderful way to showcase your baking skills. Whether you’re celebrating a special occasion or just want to indulge yourself, this cake is sure to impress and satisfy chocolate lovers of all ages. I encourage you to try your hand at this delicious endeavor, and let your creativity shine! Happy baking!