Are you ready to bring the whimsical world of Dr. Seuss into your home with playful decorations? Whether you’re preparing for a birthday party, a reading event, or just want to add a splash of fun to your décor, DIY Dr. Seuss decorations can transform any space into a vibrant masterpiece. In this article, I’ll guide you through various creative projects, share personal anecdotes, and provide tips to help you make your decorations a hit!
Why Choose Dr. Seuss Decorations?
Dr. Seuss, with his iconic characters and colorful illustrations, offers endless inspiration for decorations. Here are a few reasons to consider using Dr. Seuss themes for your next project:
- Creativity: The whimsical nature of Dr. Seuss encourages creative expression.
- Fun for All Ages: From kids to adults, everyone can appreciate the charm of Seuss’s universe.
- Easy to DIY: Many decorations are simple to create, even for novice crafters!
Essential Supplies for DIY Dr. Seuss Decorations
Before diving into specific decoration ideas, let’s gather our supplies. Here’s a list of essential materials:
- Colored cardstock and paper
- Scissors and craft knife
- Glue sticks and tape
- Markers and crayons
- String lights
- Balloon (for balloon garlands)
- Seuss-themed fabric or tablecloths
Top DIY Dr. Seuss Decoration Ideas
1. Whimsical Wall Art
Personalize your space with handmade wall art inspired by Dr. Seuss’s most beloved characters.

Materials Needed: Colored cardstock, markers, glue.
Steps:
- Choose your favorite Dr. Seuss character (like The Cat in the Hat or Horton the Elephant).
- Sketch the character using a pencil on the cardstock.
- Outline with markers and color them in.
- Cut out and mount on a larger piece of colored paper for framing.

Pro Tip:
Incorporate quotes from the books for added charm!
2. Dr. Seuss Party Hats
No party is complete without fun hats! Create colorful party hats resembling The Cat in the Hat’s iconic top hat.

Materials Needed: Red and white striped paper, scissors, glue, and elastic string.
Steps:
- Cut a long strip of red and white paper to form a cylinder.
- Glue or tape the ends together to form the hat’s base.
- Attach a piece of elastic string for wearing.
- Decorate with additional cutouts or embellishments!
Comparison of Party Hat Designs
| Hat Design | Difficulty Level | Time Required | Cost |
|---|---|---|---|
| Cat in the Hat | Easy | 30 minutes | Low |
| Green Eggs and Ham | Medium | 1 hour | Medium |
| Horton’s Ears | Hard | 2 hours | High |
3. Balloon Garland
Add a festive touch with a balloon garland in bright colors reminiscent of Dr. Seuss’s artwork.

Materials Needed: Balloons in red, blue, yellow, and green, balloon tape, and string lights.
Steps:
- Inflate balloons in various sizes.
- Attach to balloon tape in a staggered pattern.
- Hang the garland along a wall or doorway.
- Integrate string lights for a magical touch!

Personal Touch: My Experience with Dr. Seuss Decorations
Last year, I hosted a Dr. Seuss-themed birthday party for my daughter. As a huge fan of Seuss’s books, I wanted to create a real-life storybook atmosphere. I crafted wall art of The Cat in the Hat, made dozens of DIY party hats, and even had a giant balloon garland that wowed the guests. The highlight was the laughter and joy when everyone saw the decorations come to life. It taught me that with a little creativity and effort, you can create magical experiences that feel straight out of a storybook!
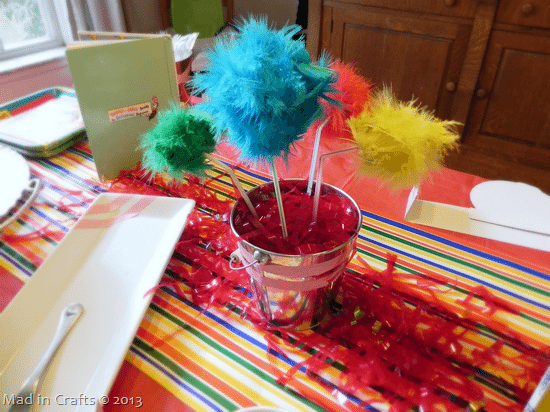
4. Seuss-Themed Centerpieces
Make your tables pop with fun centerpieces that reflect the playful nature of Seuss’s stories.
Materials Needed: Empty cans, paint, flowers or faux plants.
Steps:
- Paint the cans in bright colors.
- Fill with flowers or plant for a lively centerpiece.
- Add Seuss-themed labels for extra flair!
Tips for Planning Your DIY Dr. Seuss Decor
To ensure your decorating process goes smoothly, consider these helpful tips:
- Plan Ahead: Start your projects at least a week before your event.
- Get Everyone Involved: Make it a family activity—everyone loves crafting!
- Stay Organized: Keep materials and tools organized to avoid stress.
5. Dr. Seuss Themed Banners
Nothing sets the mood like a colorful banner! Create one that says “Happy Birthday” or “Welcome to Seussville.”
Materials Needed: Colored cardboard, string, scissors, and markers.
Steps:
- Cut out triangles from the cardboard and decorate each with letters.
- String them together and hang across a wall or table.
Pros and Cons of DIY Dr. Seuss Decorations
Pros
- Cost-effective compared to store-bought decorations.
- Personalized touch that reflects your creativity.
- Fun and engaging activity for family and friends.
Cons
- Time-consuming if you have a lot of decorations to create.
- May require skills in crafting and design.
Frequently Asked Questions (FAQs)
What types of materials are best for Dr. Seuss decorations?
Bright colored cardstocks, fabric, balloons, and paints work well for all types of decorations.
Where can I find Dr. Seuss-inspired templates for DIY projects?
You can find printable templates on various craft websites and resources dedicated to children’s crafts.
How can I make my Dr. Seuss party more engaging for children?
Incorporate storytime sessions, Seuss-themed games, or even a character dress-up contest to enhance the experience!
Conclusion
Creating your own Dr. Seuss decorations is not only fun but also allows you to express your creativity and bring joy to others. With simple materials and a little imagination, you can transform any space into a colorful, whimsical world reminiscent of Dr. Seuss. So grab your supplies, gather your loved ones, and start crafting today! You’ll create memories that are just as magical as the stories themselves.