Welcome to the fascinating world of decorative embroidery edge stitches! As an avid sewing enthusiast with years of experience, I can tell you that mastering these stitches opens a treasure chest of creative potential. Whether you’re a beginner looking to add flair to your projects or an experienced crafter aiming to refine your skills, this comprehensive guide will provide you with everything you need to know.
What Are Decorative Embroidery Edge Stitches?
Decorative embroidery edge stitches are specialized sewing techniques used to embellish the edges of fabrics. They serve not only functional purposes, such as finishing raw edges to prevent fraying but also enhance the visual appeal of your projects. From adding delicate borders to bold statements, these stitches can transform ordinary pieces into extraordinary works of art.
Types of Decorative Embroidery Edge Stitches
Let’s delve into some popular decorative edge stitches that you can easily incorporate into your sewing projects.
1. Satin Stitch
The satin stitch is a versatile stitch that gives a smooth, glossy appearance, perfect for outlining shapes or filling in spaces. It consists of closely spaced zigzag stitches, creating a dense layer of thread.
How to Sew a Satin Stitch
- Set your sewing machine to a zigzag stitch.
- Adjust the stitch width and length according to your fabric type.
- Guide your fabric slowly, aligning the edge of the fabric with the needle.

2. Zigzag Stitch
The zigzag stitch is one of the most common and useful stitches for finishing edges. It prevents fraying and is often used on knit fabrics.
Benefits of Using a Zigzag Stitch
- Flexibility for stretching fabrics
- Quick and easy to sew
- Good for decorative borders
3. Fringe Stitch
The fringe stitch creates a lovely textured effect on fabric, often used in decorative projects. It’s characterized by loops of thread that create “fringe” along the edge.
Steps for Crafting Fringe Stitches
- Use a thick cotton thread for a pronounced effect.
- Position your needle to create loops as you sew.
- Secure the base of the loops with straight stitches to prevent unraveling.

Comparison of Decorative Edge Stitches
| Stitch Type | Purpose | Difficulty Level | Best For |
|---|---|---|---|
| Satin Stitch | Filling and outlining | Intermediate | Quilts, appliqué |
| Zigzag Stitch | Edge finishing | Beginner | Knits, woven fabrics |
| Fringe Stitch | Textural embellishment | Advanced | Decorative arts, upholstery |
Personal Experience: My Journey with Edge Stitches
When I first started sewing, edge stitches seemed daunting. However, after practicing consistently, I discovered how transformative they can be. I vividly remember the first quilt I made with satin stitches—each stitch seemed to breathe life into my creation. After that project, I couldn’t help but experiment with different types of edge stitches, and the results were consistently rewarding.

Choosing the Right Thread and Fabric for Edge Stitches
Selecting Threads
The type of thread you choose can greatly impact the final appearance of your decorative stitches. Here are some tips:
- DMC Embroidery Floss: Ideal for hand embroidery projects.
- Mettler Silk Finish Cotton: Perfect for machine sewing with a luxurious finish.
- Polyester Threads: Great for durability on high-stress seams.
Choosing Fabric
Not all fabrics are created equal when it comes to decorative edge stitches. Here’s a quick guide on fabric choices:
- Stretch Fabrics: Use a zigzag stitch for flexibility.
- Woven Fabrics: Satin stitches create beautiful, polished edges.
- Denim: Heavy fabrics like denim may require a stronger stitch, such as a triple zigzag.
Tips and Tricks for Perfecting Decorative Embroidery Edge Stitches
1. Practice on Scrap Fabric
Before tackling your main project, practice on scraps to perfect your technique and settings.
2. Use a Stabilizer
Especially for delicate fabrics, using a stabilizer can help maintain shape and prevent puckering.
3. Keep Thread Tension in Check
Monitoring your thread tension is crucial for achieving even stitches. Adjust the tension as needed based on your fabric type.
Pros and Cons of Decorative Edge Stitches
Pros
- Adds visual interest to projects
- Enhances the durability of seams
- Variety of techniques for different effects
Cons
- Can be time-consuming for intricate designs
- Requires practice to master
- May need special tools or stabilizers
Common FAQs About Decorative Edge Stitches
What are the most popular decorative edge stitches?
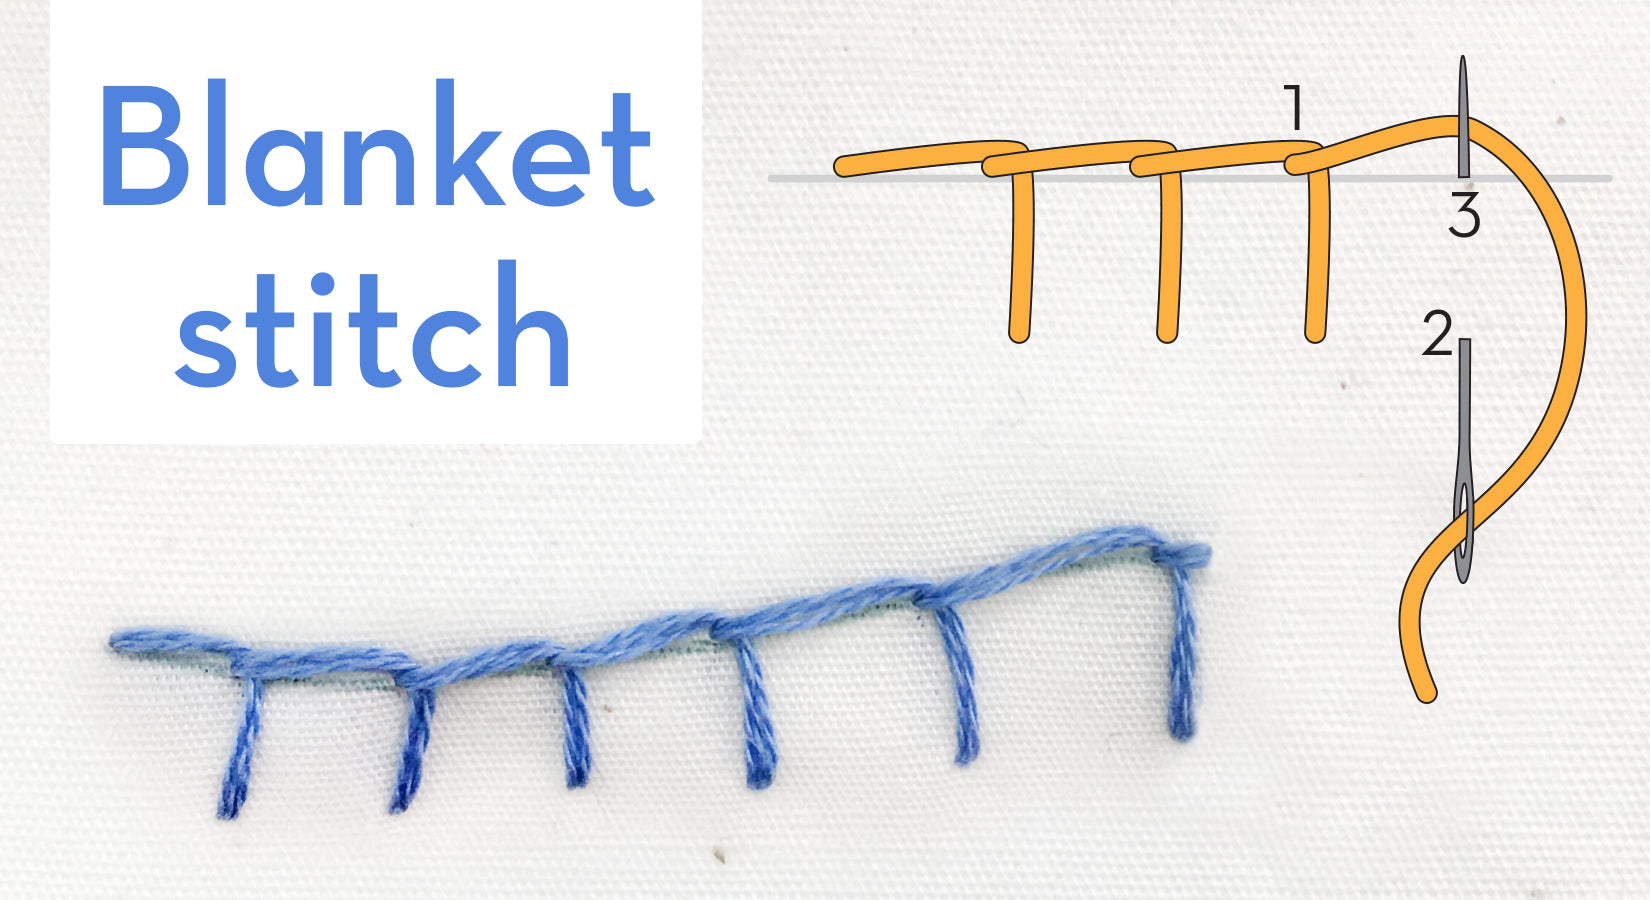
The most popular stitches include satin stitch, zigzag stitch, and blanket stitch, each serving different purposes in decorative sewing.
Can I use decorative edge stitches on any fabric?
While you can use decorative stitches on many fabrics, it’s essential to choose the right stitch for the fabric type to avoid puckering or damage.
How do I troubleshoot uneven edge stitches?
Uneven stitches may be due to incorrect tension, mismatched thread and fabric types, or lack of a stabilizer. Adjusting these factors usually resolves the issue.
Projects to Practice Decorative Edge Stitches
Here are some project ideas to hone your skills:
- Quilt Borders: Use satin stitches to embellish the edges of your quilts.
- Embroidered Pillows: Add inventive designs to cushion covers.
- Decorative Table Runners: Enhance your dining decor with unique edge stitching.
Conclusion: Unleash Your Creativity with Decorative Edge Stitches
Decorative embroidery edge stitches are not just techniques; they’re a pathway to expressing your creativity and personal style. With practice and experimentation, you’ll discover the vast possibilities these stitches offer. I hope this guide inspires you to grab your sewing machine, thread, and fabric, and start creating! Happy stitching!