If you’re a fan of Tim Burton’s iconic film, The Nightmare Before Christmas, you know that holiday spirit can hit differently when you blend Halloween and Christmas themes. Why not bring that whimsy and charm to your outdoor decorations with some DIY flair? In this article, I’ll share my experiences and tips for creating stunning DIY Nightmare Before Christmas outdoor decorations that will not only impress your neighbors but also ignite nostalgia for all ages!
The Magic of DIY Decorations
Creating your decorations can be one of the most rewarding experiences during the holiday season. Not only do these projects allow you to showcase your creativity, but they also provide a personal touch that store-bought items simply can’t match. Plus, DIY decorations tend to be budget-friendly!
Why Choose Nightmare Before Christmas Theme?
- Unique blend of Halloween and Christmas.
- Nostalgic appeal for fans of all ages.
- Endless creativity in design and execution.

Gathering Materials for Your DIY Projects
Before diving into the projects, let’s gather the essential materials. Most of these can be found at your local craft store or online. Here’s a quick list:
- Plywood or EVA foam for cutouts
- Outdoor paint (acrylic or spray paint)
- LED lights
- Fishing line or wire for hanging
- Hot glue gun and glue sticks
- Sandpaper (for smoothing edges)
- Sealant (to protect your decorations from the elements)
Top DIY Projects for Nightmare Before Christmas Outdoor Decorations

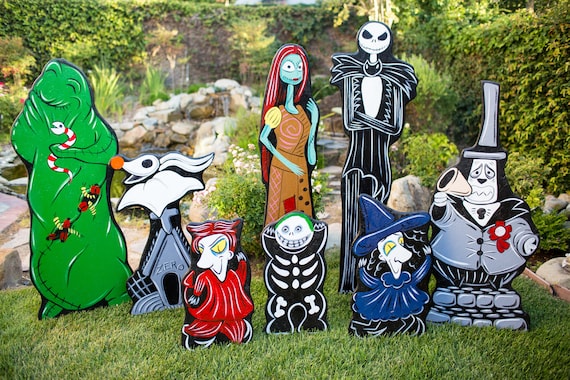
1. Jack Skellington Yard Cutouts
One of the most iconic characters from the film, Jack Skellington, makes a perfect addition to your yard decorations. Here’s how to create him:
Materials Needed
- Plywood or EVA foam
- Black and white outdoor paints
- Sandpaper
- Sealant
Instructions
- Draw a large outline of Jack Skellington’s face on the plywood or foam.
- Cut out the shape carefully using a jigsaw or craft knife.
- Smooth the edges with sandpaper.
- Paint the cutout with white outdoor paint; once dry, add black details for the eyes and mouth.
- Seal your cutout with a weatherproof sealant to ensure durability.
- Lastly, place your Jack in the yard, using stakes to hold him steady.

Pros and Cons

| Pros | Cons |
|---|---|
| Highly recognizable character | Time-consuming |
| Customizable size | Requires some woodworking skills |
2. Sally’s Pumpkin Patch
Sally, Jack’s love interest, would not be complete without her peculiar and delightful pumpkin patch. Here’s how you can recreate this enchanting scene:

Materials Needed
- Small pumpkin decorations
- Fabric scraps (for Sally’s dress)
- Green foliage or fake grass
Instructions
- Create a small mound in your yard and cover it with green foliage.
- Arrange the pumpkins on top of the foliage.
- Use the fabric scraps to create a small doll that resembles Sally, placing her in the patch.
Pros and Cons
| Pros | Cons |
|---|---|
| Great for kids’ interaction | Requires a bit more space |
| Can be reused for future Halloweens | Need to maintain foliage |
3. Oogie Boogie Light Show
If you’re looking to scare up some excitement, why not create an Oogie Boogie light display? This project is sure to be a hit with the trick-or-treat crowd!
Materials Needed
- Green lights (LED preferred)
- Black fabric or mesh
- Battery-operated fans (optional, for movement)
Instructions
- Set up your green lights around your yard, creating an eerie glow.
- Use the black fabric or mesh to create a ghostly figure, draping it in front of the lights.
- If you have battery-operated fans, place them near the fabric to make it flutter in the wind.
Pros and Cons
| Pros | Cons |
|---|---|
| Creates an atmospheric display | Lights might need frequent checking |
| Inexpensive and easy to set up | Requires nighttime to fully appreciate |
Tips for Successful DIY Decorations
Lighting Up Your Decorations
Proper lighting can elevate the ambiance of your decorations significantly. Here are a few tips:
- Use LED lights for energy efficiency and longevity.
- Select colors that represent the characters (e.g., green for Oogie Boogie, white for Jack).
- Incorporate motion lights for added surprise elements.
Weatherproofing Your Decorations
To ensure your creations last through the season, consider the following:
- Seal wooden pieces with two coats of weatherproof sealant.
- Use outdoor-rated paints and materials.
- Bring more delicate items inside during inclement weather.
Engaging the Community
The Nightmare Before Christmas has a tremendous fanbase, and your decorations can be a focal point for community engagement! Consider hosting a neighborhood decorating contest or open house to showcase your handiwork and inspire others.
Frequently Asked Questions
What can I use to make DIY decorations for the Nightmare Before Christmas?
Use materials like plywood, EVA foam, paint, LED lights, and fabric. Basic tools such as scissors, a jigsaw, and hot glue will also come in handy.
Are DIY decorations better than store-bought ones?
DIY decorations allow for personalization, creativity, and usually cost less, although they do require more time and effort.
Can these decorations withstand rain or snow?
Yes! By properly sealing your decorations with weatherproof sealant and using outdoor-rated materials, they can withstand the elements. However, it’s always best to bring fragile items indoors during harsh weather.
Conclusion
Creating DIY Nightmare Before Christmas outdoor decorations can be an incredibly fun and fulfilling way to celebrate the holidays. Infusing your personal touch into each project adds a unique charm that will surely delight family, friends, and neighbors alike. With a bit of creativity and some elbow grease, your yard can transform into a whimsical wonderland that captures the heart of the classic film. Happy crafting!