As a cake decorator, one of the most satisfying and creative aspects of the job is bringing a cake to life with beautiful decorations. One technique that often gets overlooked but can add a delightful touch to your creations is decorating with grass. Whether you’re designing a cake for a child’s birthday, a garden-themed party, or just because, mastering the art of grass decoration can elevate your skills. In this guide, I’ll share the best tips and techniques I’ve learned over the years, along with personal insights and comparisons of various methods.
Why Grass Decoration Matters in Cake Design
Grass decoration can transform an ordinary cake into a vibrant centerpiece. It adds texture, color, and a touch of whimsy. Below, I’ll explain why mastering this technique is a valuable skill for any cake decorator.
Enhancing Visual Appeal
Visually, grass creates a sense of realism. Whether you’re decorating for an outdoor theme or a garden party, the addition of grass provides depth and interest that can make your cake stand out.
Versatility
Grass can be adapted to various themes, including sports fields, garden parties, or animal-themed cakes. Its versatility allows you to use the same technique in different contexts.
Engagement and Interaction
When a cake features intricate designs like grass, it can spark conversation among guests, encouraging them to appreciate the details and artistry involved.

Tools You Need for Grass Decoration
Before diving into techniques, let’s ensure you have the right tools. Below is a list of essential tools you’ll need to create a grass effect:
Essential Tools
- Piping bags
- Grass piping tip (usually Wilton #233)
- Buttercream or royal icing
- Offset spatula
- Cake board
- Food coloring (optional)
Comparison Table: Grass Piping Tips
| Tip Number | Tip Style | Grass Texture | Best For |
|---|---|---|---|
| 233 | Multi-prong | Thick Grass | General lawn effects |
| 352 | Leaf | Sparse Grass | Realistic garden themes |
| 47 | Star | Textured Grass | Mixed landscapes |
Best Techniques for Creating Grass on Cakes
Now that you have your tools ready, let’s explore some techniques for creating grass. Each method offers a unique finish, and depending on your design, you can choose the one that best suits your needs.

Buttercream Grass Technique
Using buttercream is perhaps the most straightforward way to create grass. Here’s how to do it:
Step-by-Step Instructions
- Prepare your cake and apply a crumb coat.
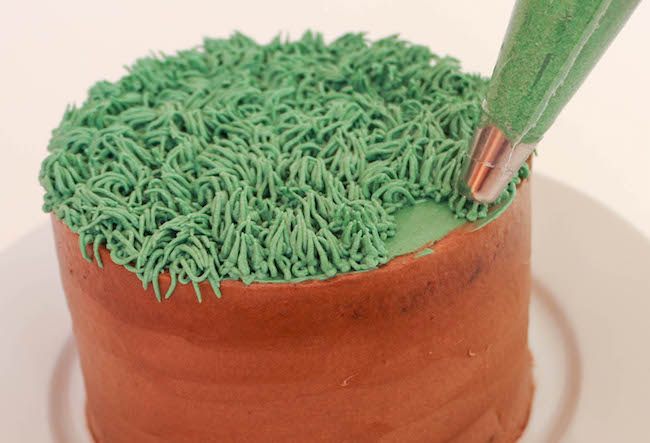
- Using your grass piping tip, fill your piping bag with buttercream.
- Starting from the base of the cake, apply pressure and pull up to create blades of grass.
- Repeat this process, varying the lengths and angles for a more natural look.

Personal Experience Insight
When I first started, I struggled with pressure control. I encourage you to practice on parchment paper before working on your cake. This will help you master the technique with confidence.
Royal Icing Grass Technique
Royal icing offers a sturdier finish, which can be great for embellishing cake toppers or creating decorations that need to hold their shape.

Step-by-Step Instructions
- Prepare your royal icing and color it green using food coloring.
- Fill your piping bag with a small round tip.
- Pipe straight lines for blades of grass, allowing some to overlap for depth.
Tips for Achieving Realistic Grass Effects
To make your grass look as realistic as possible, consider the following tips:

- Vary the Color: Use different shades of green to mimic real grass.
- Layering: Start with a base layer and build upon it for depth.
- Texture: Use a fork or toothpick to add texture to your grass.
Pros and Cons of Each Technique
| Technique | Pros | Cons |
|---|---|---|
| Buttercream | Easy to work with; delicious | Can melt in heat; softer texture |
| Royal Icing | Hardens well; great for details | Can be challenging to pipe; less flavorful |
Common Mistakes to Avoid
Even seasoned decorators can fall into traps that affect the final look of their grass. Here are some mistakes to watch out for:
Over-piping
Be mindful of the amount of icing you’re piping. Too much can lead to clumps rather than blades of grass.
Inconsistent Pressure
Maintaining consistent pressure is key to achieving uniform grass blades. Practice makes perfect!
Neglecting Color Variation
Using a single shade of green can make your grass appear flat. Incorporate various shades for a more dynamic look.
Frequently Asked Questions (FAQs)
What is the best icing for grass decoration?
The best icing for grass decoration is often buttercream due to its flavor and workability. However, royal icing can be used for more structured designs.
Can I use fondant to create grass?
Yes! You can use fondant to make grass by rolling it into thin strands. It provides a different texture and can hold its shape well.
How do I store a decorated cake with grass icing?
Store your cake in a cool place, ideally in the fridge, if you’ve used buttercream. Ensure it’s covered to prevent drying out.
How long does grass icing last?
Grass decorations made from royal icing can last for weeks if stored properly, while buttercream decorations are best consumed within a few days.
Conclusion
Mastering cake decorating tips for grass can significantly enhance your cake designs. With the right tools, techniques, and a bit of practice, you can create stunning grass effects that impress your friends and family. So get creative, experiment with colors and textures, and most importantly, enjoy the process of cake decorating!